[Part four of the Photography Fundamentals series, be sure to check out all 10 posts!]
Now that we’ve covered the basics about what to let into your camera (lighting and composition) let’s focus on how all that reflected light gets into your camera: your lens.
Volumes have been written on camera lenses; which glass refracts light best, whether to shoot prime or zoom, but honestly, most of that stuff doesn’t matter. In fact through the rest of this post I’m going to assume that you can’t change your lenses, that you’re stuck with the motorized piece of plastic and glass that’s stuck to the front of your point and shoot camera.
Even without spending $1500, you can make decisions about your lens that affect the quality of the image you’ll get.
 Focal Length:
The focal length of a lens refers to the distance your lens uses to bring an image into focus. The longer the focal length the more the image is magnified; hence, “longer” lenses will bring your subjects closer and shorter lenses will make them seem further away.
[Click image on the right for larger view]
But I only have one lens on my camera?
Actually most consumer cameras have a zoom lens. That’s a lens with multiple focal lengths. The camera probably says something on it like “5.0-20.0”. It’s telling you the lens’s range in focal length. You already have a variety of focal length lenses available for your photographic pleasure.
Wide:
When your lens is all the way in (at it’s shortest focal length) you are at your “wide” lens setting. Wide shots are used for, well, wide images. Landscapes, City Scapes, Nature Scapes or any other types of scapes you can think of. They are also good for staff group photos, especially the “fun” one.

When you choose a wide setting for your camera lens, you will want to make sure whatever you are photographing is far away. Close ups with a wide lens are a no-no, but more on that later.
Medium:
Halfway through your zoom-in you’ll find your medium focal length. Medium focal lengths tend to be pretty bland because they aren’t wide enough or close enough to give people a perspective they’re not used to.
That said, medium shots can be used for traditional portraits (depending on how far away your subject is). Always keep in mind though, that humans like to see perspectives in pictures that they don’t see every day with their own eyes. Medium focal lengths can often produce “every day” images. Don’t ignore them all together. Just keep in mind that you’re trying to create something extraordinary.
Long:
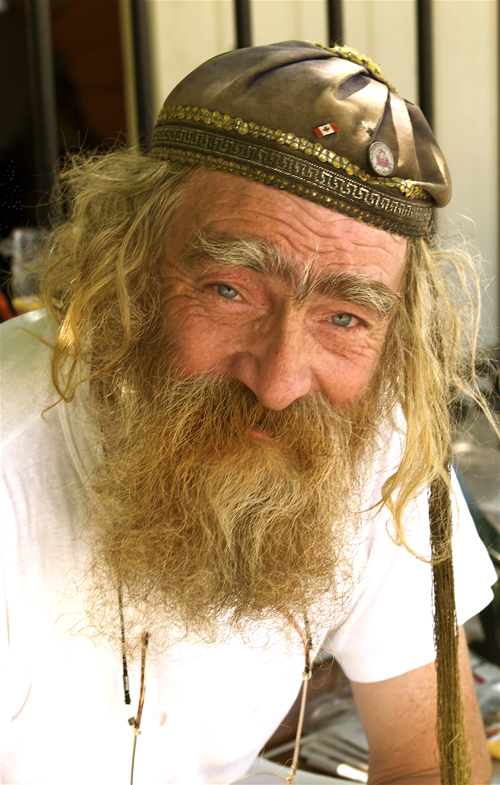
Towards the end of your focal lengths (probably when your lens is extended all the way out) is your longest focal length, these are used for close up shots or when you are trying to capture an image of something that is far away from you.
Close ups with a long lens can eliminate noise or ugly environments and give a unique perspective on a subject, often showing more detail of an area than we typically see. Everyone has seen the “Eye Close Up” picture. They’re almost cliche, but what makes a huge image of an eye interesting is that it allows us to see an image that is unusual and extraordinary.

Long focal lengths are also used quite practically for situations where your subjects are far away, such as sporting events and nature photography. Both situations can be frustrating with a consumer camera. But don’t give up easily.
Focal Length and Depth of Field:
Although this will be covered more in a later section, the focal length of a lens directly effects your images depth of field, or how much of your image is in focus. The longer the focal length, the more likely you are to get a shallow depth of field. With wide (short) focal lengths, a shallow DOF is almost impossible to achieve.
This is why you should almost always take portraits with a longer lens. In portraits it’s very common to have your subject in focus and the background in bokeh (or out of focus).
Angle of View – Image Distortion:
One last consideration when choosing a focal length is angle of view. To over simplify, a lens’ angle of view describes how much of an scene (the “breadth”) is focused onto your sensor. The wider the angle of view, the more your images is bent, or distorted.
This can create the “super wide” effect where distance is exaggerated. In general, and especially on consumer cameras, you’ll want to avoid image distortion. Most cameras’ stock lenses default to a wide angle, which means you could easily take a photo with distortion in it.

To avoid angle of view distortion, keep your lens a good distance away from your subject. Don’t hold it too close, especially to a person’s nose. They won’t be happy about the picture.
See? Even without swapping out lenses in your camera, there are plenty of decisions to be made about your lens. As always, remember that these are not rules, just guidelines with a goal of helping you produce amazing images.
[Part four of the Photography Fundamentals series, be sure to check out all 10 posts!]
Brian Notess
<3 Code, <3 Film, <3 Coffee. Combine ingredients for instant fun.


I’ve been trying to delve into photography a lot more as of late. This really helps me. Thanks!
That’s awesome Brian. Delve away, and make sure to share your stuff on twitter or something 🙂
Will do. Kinda makes it hard to use your SLR when you have a fancy iphone with Camera +. and Instagram installed on it that you carry everywhere while the SLR sits in a backpack, right? haha 😉