This is Part 2 of The Beginner’s Guide To Understanding Ajax.
In the last post, we outlined exactly what’s happening during an Ajax request.
Namely that a request is initiated, the server handles the request, and sends a response back to the browser.
But what does this look like in a practical setting? In this post, we’ll take a look the different things needed to setup an Ajax request and how to write a very simple Ajax utility.
1. Setting It Up
This post is assuming that you have a local development environment setup. Specifically, that of a web server, PHP, and related tools.
One setup, we need to think about the three things that we’re going to need to in order to setup an Ajax request:
- We need a page to display data
- A server-side script for returning data when requested
- Someway to initiate the request
- A simple CSS file for styling our data
Here’s how I’ve organized my files:

2. A Look at the Source
First, let’s go ahead and setup our page. Mine contains two heading elements and a link. Set yours up however you like but note the ID attributes I’ve given my elements. This will matter soon:
[cc lang=”html”]
This will be replaced via Ajax
It has not been updated yet.
[/cc]
While we’re working on the presentation logic, go ahead and setup the stylesheet. It’s simple:
[cc lang=”css”]
.not-updated { color: rgb(200, 0, 0); }
.updated { color: rgb(0, 200, 0); }
[/cc]
Next, we need to setup our server-side file. For purposes of this example, we’ll have the server return us a message that says Hello World. Of course, in a practical application, this is where data is normally retrieved from a database.
[cc lang=”php”]
[/cc]
Finally, we need to setup the JavaScript source for initiating the request and handling the data. I’ve commented every line of the code below:
[cc lang=”javascript”]
$(function() {
// when the link is clicked
$(‘#changeTitle’).click(function() {
// initiate an ajax request
$.get(‘hello.php’, function(data) {
// set the server’s response data into the title element
$(‘#title’).text(data);
// update the subtitle’s classname and text
$(‘#subtitle’).removeClass(‘not-updated’).addClass(‘updated’).text(‘It has been updated!’);
});
});
});
[/cc]
That’s it!
Launch the page, click the link, and you should see the content of the first heading element change and the color and text of the second element change.
3. Watching It Happen
That’s fun, but how do we know that it’s actually an Ajax request? There are a couple of ways to prove it but perhaps the most popular way is to launch a Firebug console.
Start Firefox, load up Firebug, and launch the page. You should see a blank console window:
![]()
Click the link and notice that a new line will appear in your Firebug console. This line represents that an asynchronous request has been made:

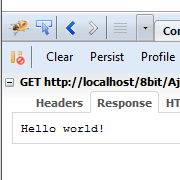
Taking it one step further, you can actually get some information about the request by expanding this line. Below, you’ll notice that I have the response tab highlighted showing exactly the contents of our PHP file:

In about as simple terms as it gets, that’s Ajax.
Obviously this is not a mature application but many of the same principles apply in building larger solutions. Nonetheless, hopefully this helped lay a foundation for how you think about asynchronous requests.
This concludes the The Beginner’s Guide To Understanding Ajax.
Tom
I write both code and content for this team and I love every minute of it.


Speak your mind...