This is Part 5 of The Complete Guide To Writing a WordPress Widget Series.
At this point, we’ve got a fully functional widget that allows us to configure a few options and save them to the WordPress database. Of course, widgets are most useful whenever they are able to be used by others. Right now, our widget has no representing on the blog itself.
In this article, we’ll write the code necessary to display the widget on the blog itself.
1. What’s Needed?
Remember that this particular widget has two options:
- It will allow the user to publish a tweet displaying the blog’s title and URL
- It will allow the user to publish a custom message based on whatever the blog’s administrator has provided in the widget’s administration panel.
It will help to quickly read up on the blog_info() function in the WordPress API. Other than this, we’ll be writing a little bit of markup and a little bit of JavaScript.
2. Writing The Basic Widget Display
Recall from the second post of this series that the widget function is what’s necessary for actually displaying the widget on the blog.
Later in the post, we can dress it up a little bit but for now, let’s just get a basic link to show up on the blog. Add this to your plugin’s widget function:
[cc lang=”html”]
[/cc]
At this point, your complete widget function should look like this:
[cc lang=”php”]
function widget($args, $instance) {
?>
The final widget function should look like this:
[cc lang=”php”]
function widget($args, $instance) {
extract($args, EXTR_SKIP);
$use_custom_info = empty($instance[‘use_custom_info’]) ? ” : apply_filters(‘use_custom_info’, $instance[‘use_custom_info’]);
$custom_message = empty($instance[‘custom_message’]) ? ” : apply_filters(‘custom_message’, $instance[‘custom_message’]);
?>
4. Dress it up
Before finishing up, let’s make our Tweet It link stand out a little bit.
First, create a new file in your plugin’s CSS directory called tweet-it-widget.css and add the following code:
[cc lang=”css”]
.tweet-it-container { -moz-border-radius: 5px; -webkit-border-radius: 5%; border: 1px outset black; padding: 0.5em; }
.tweet-it-container:hover { -moz-border-radius: 5px; -webkit-border-radius: 5%; border: 1px inset black; padding: 0.5em; }
.tweet-it-container a { color: #000; text-decoration: none; text-transform: uppercase; text-align: center; display: block; font-family: Arial, Sans-serif; font-weight: bold; letter-spacing: -1px; font-size: 2em; text-shadow: 1px 2px 1px #888; }
[/cc]
Next, we need to revisit the first function in our widget file. We’ll need to introduce an else clause into the is_admin conditional in order to include this stylesheet for all users browsing the site that are not viewing the administration panel.
[cc lang=”php”]
if(is_admin()) {
// SNIP..
} else {
$admin_style_url = WP_PLUGIN_URL . ‘/tweet-it/css/tweet-it-display.css’;
$admin_style_file = WP_PLUGIN_DIR . ‘/tweet-it/css/tweet-it-display.css’;
if(file_exists($admin_style_file)) {
wp_register_style(‘tweet-it-display-styles’, $admin_style_url);
wp_enqueue_style(‘tweet-it-display-styles’);
}
}
[/cc]
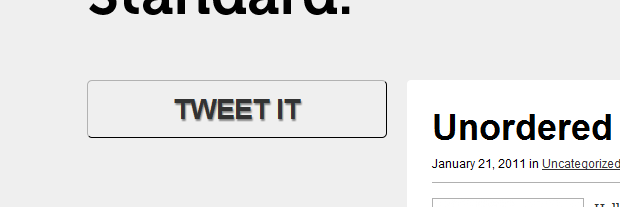
Assuming that all goes well, you should see something like the following:

And that’s it.
In the final post in this serious, we’ll take a look at how you can go about distributing your plugin but for all intents and purposes, this thing is done. Grab a copy of it here!
Tom
I write both code and content for this team and I love every minute of it.


Excellent write-up, but there are a few spots where you contradict yourself and could throw some folks off. For instance, at the start of the guide, you create the folder “twitter-it” in the Plugins directory. Then, throughout the guide, you call to CSS and JS files in a “tweet-it” folder.
Other than that, excellent stuff and a very easy read to get through.