Yesterday, we started to to build a Church Events page in WordPress by creating a Custom Post Type.
Although you can setup an Events page in WordPress by manipulating your categories, we are going to build this out into its own section. Here’s a recap of the requirements for our simple Events page:
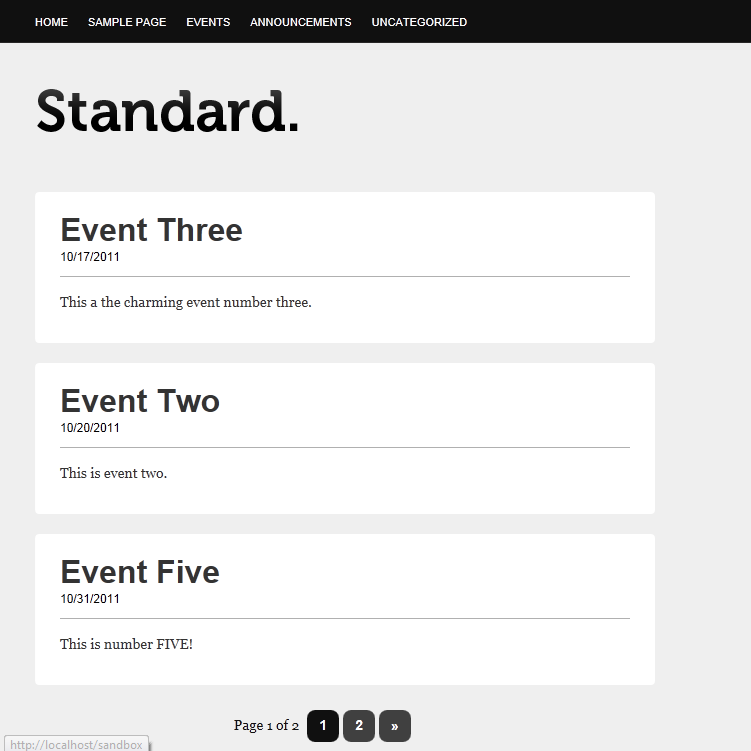
- Dedicated Events listing in WordPress Admin.
- List Events on the Events Page in ascending order, based on Event date, not date posted.
- Automatically stop displaying Events on the Events Page that have already occurred.
By keeping your Events listed separately, you’ll have an easier time keeping track of your content. WordPress is a CMS, so let’s treat it like so.
If you’ve completed Part 1, I’m guessing you’re feeling pretty awesome.
You should.
Now, let’s get things ready, so we can display your newly created Events.
Order
When WordPress pulls your Custom Post Type, this is generally the order you’ll see:
- Page > Page Template >Loop
This is the direction or the road WordPress takes (or at least that’s how I think about it). There may be some variances depending on how your template is setup.
Although this is the thread I follow to figure out where WordPress is going, when I am editing something new, I start from the end and work my way to the front.
So, let’s start with the Loop.
The Loop
Like many things, this can be accomplished more than one way. I am simply showing you how I’ve gone about it. If you’ve poked your nose around WordPress themes, much, I’m sure you’ll have no problem adapting this to your current theme.
First, open up your Loop. You’re going to edit the Loop that renders your regular WordPress blog posts. Your Custom Post Type has been defined as a Post type, so that’s how it will behave.
Before changing one line of code, save it as a new file name!
If it’s loop.php, rename it to loop-event.php.
Delete
Until you’re ready to add some bells and whistles to your Event Loop, we’re going to trim the normal Loop used to display Posts.
For example, I removed a good portion of my Meta Post data. I deleted the posting date, comment number, and category. Again, this is going to vary from theme to theme. If you have tags and author name, you’re more than likely going to want to remove those, too.
If you want to go back later and add the Event Date automatically, I recommend leaving the div or p class that defines the Post date, and only stripping out the php. We can go back later and add a function that will drop in the Event Date accordingly.
For example sake, this was my code before:
[cc lang=”php”]
[/cc]
And my code after:
[cc lang=”php”]
[/cc]
You may notice that I didn’t even bother removing the URL from the Event title. I’ve done this on purpose. I want to give the user the option of using a more tag for more information or even add a sign up email form tied to the Event listing. Plus, by giving each event a Single Page capability, it can easily be shared via social media.
I hate to be repetitive, but I just want to make sure you’re not doing a bunch of copy and paste to get through this. My example is relative to the theme I am building on (Standard Theme). This will vary from theme to theme.
And?
I know today wasn’t very exciting, but this is an important step. Make sure you’re removing complete pieces of code and not leaving anything hanging behind that will jam things up and break it.
Tomorrow, we’ll pull from this Loop into action, as we build the Event Page Template!
Eric Dye
Support Lead at Valet, and Proprietor of DYECASTING. Human by day, gamer at night, lover of coffee, and all things spicy.


[…] Eric Dye on October 19, 2011Alright.By now, you should have created your Event Custom Post Type and edited and created a Loop specifically made for your soon-to-be-created WordPress Events Page.Like I said, yesterday, […]