![How to Write Sermons in Scrivener [Tutorial]](https://churchm.ag/wp-content/uploads/2016/11/sermons-in-scrivner-image.jpg)
I recently purchased Scrivener, one of the premier writing apps out there, and I’ve found what might be a novel use for it.
And I don’t mean writing novels.
In case you’re unaware, aside from writing for ChurchMag and working as a teacher, I’m also a part-time discipleship pastor. I’ve been on staff at my church for almost ten years, and in that time, I’ve truly grown as both a pastor, leader, and preacher. One of the ways I’ve grown the most is in my sermon preparation. I’m a bit of a natural communicator, but I’m far too improvisational and hyperactive to rely on this skill. Preparation is necessary, not only to keep myself in check but also to keep me tied to the source of every sermon: the Scripture, illuminated and made alive by the power of the Holy Spirit.
This past Summer, in preparation for a Sunday morning sermon – my third ever! – I found what may be a perfect sermon prep technique, and I’d love to introduce it to you, step-by-step.
Step 1: Outline in Scrivener
My first step is to create the outline of my major points. This is where a lot of minsters start, though it’s not without it’s shortcomings. Many times, I’ve had to redo my outline in the midst of writing a sermon before. It’s not fun, but I still think this is the best method.
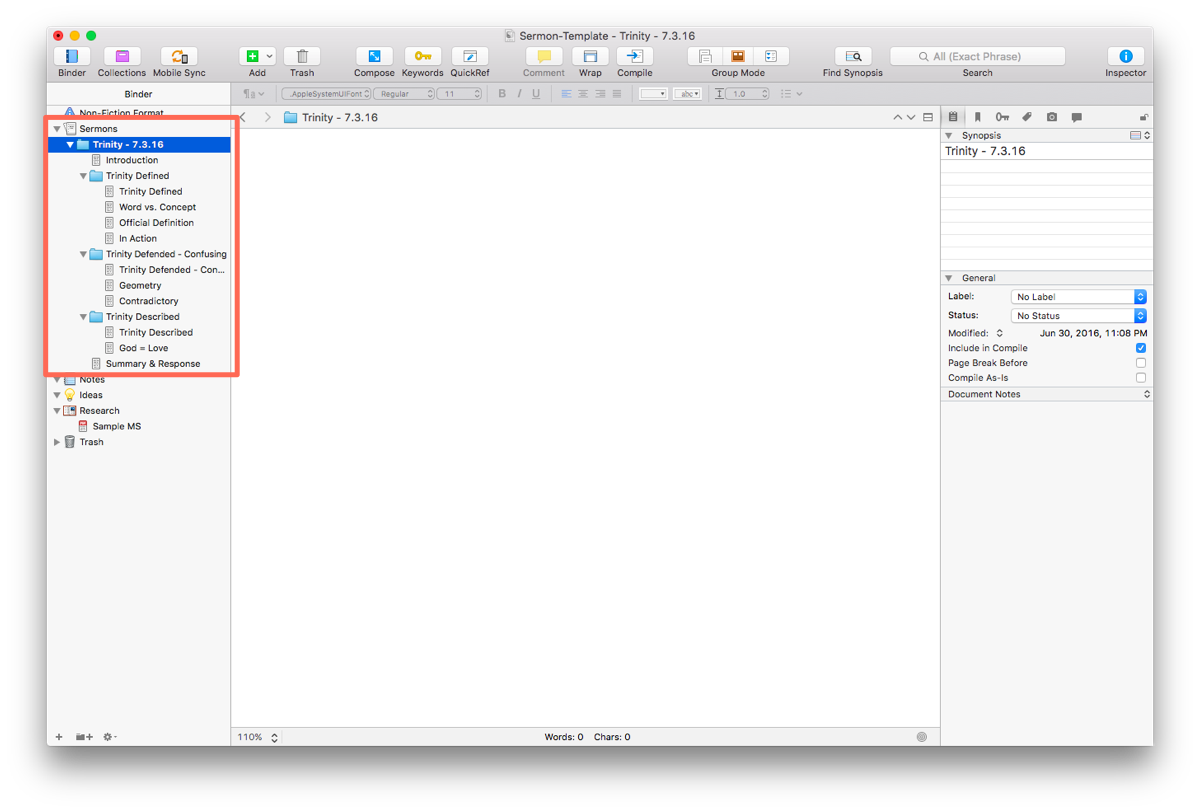
Now, the way I outline in Scrivener is fairly simple. In the Binder on the left, I create a top level folder that will contain the entire sermon. Then, I create folders for every point, nesting the sub-points underneath each. In the image below and in the template I’ll be attaching at the bottom, you’ll see that I’ve duplicated the folder-point’s title in the first sub-point. That’s because, for some reason, text placed in folders–which the app lets you do–will not be visible when compiled. Once I figure that out, I’ll remove this duplicate sub-point. Until then, its an easy workaround.
Step 2: Notecard in Keynote
Once I’ve outlined, I’ll open Keynote. (Windows or Chrome users, you can use PowerPoint or Slides.) Once in Keynote, I’ll create at least once slide for each point, usually making the title of that slide correspond to the title of the point. Then, I’ll add a few thoughts or a Scripture or both–whatever best fits the point that I’m trying to make. This should be fairly clear in the Keynote/PDF copy I’m providing you with.
Once I’ve finished this, I’ll have an outline that I can use to frame the rest of my message, notecards with thoughts and Scripture that I can flesh out into the actual sermon content, and slides for use on the screen when I speak. Talk about multiple birds with one stone!
Step 3: Insert Notecards into the Outline
(This part could be a technical, as it depends on your presentation software and the method by which you’ll be taking your sermon to the pulpit with you. Because of this I’ll try to be clear with room for diversity.)
Once I’ve made my slides in Keynote, I export them as images. From there, I resize them. I use a 1920×1080 Keynote template because that’s resolution of our projector. However, that would make the image too big to place within Scrivener. I’ve found that–in order to preserve the aspect ratio–600×338 works fairly well. After resizing, I drag and drop each image into the appropriate place in Scrivener. Depending on how many “notecards” I made for each point, I may have anywhere from one to four images in a Scrivener “sub-point.” But that’s ok because I’m about to connect the dots.
Step 4: Manuscript the Sermon
After all of this, I begin to write out my sermon long-form. It’s not a true manuscript, though, as there are times when I will use shorthand. Now, if you look closely, you’ll see that I’ve duplicated a lot of what’s on my notecards into the body of my text. There are two reasons for this technique: 1) I don’t want to forget to make these points and 2) it helps me to have the whole of the text, with as few gaps as possible, punctuated with the notecards, which then serve as highlights.
So, at this point, I should have my sermon broken down into small pieces with notecard-images breaking up large portions of the text.
Now, I’m ready to finalize.
Step 5: Compile & Transfer
(Again, here is where preference, taste, and operating system will bring about some vagaries. I will say that I have had an issue with my .docx files being formatted for A4 paper, which is small thing to correct, but it took me quite a while to figure out what the issue was when I first encountered a problem with my printer.)
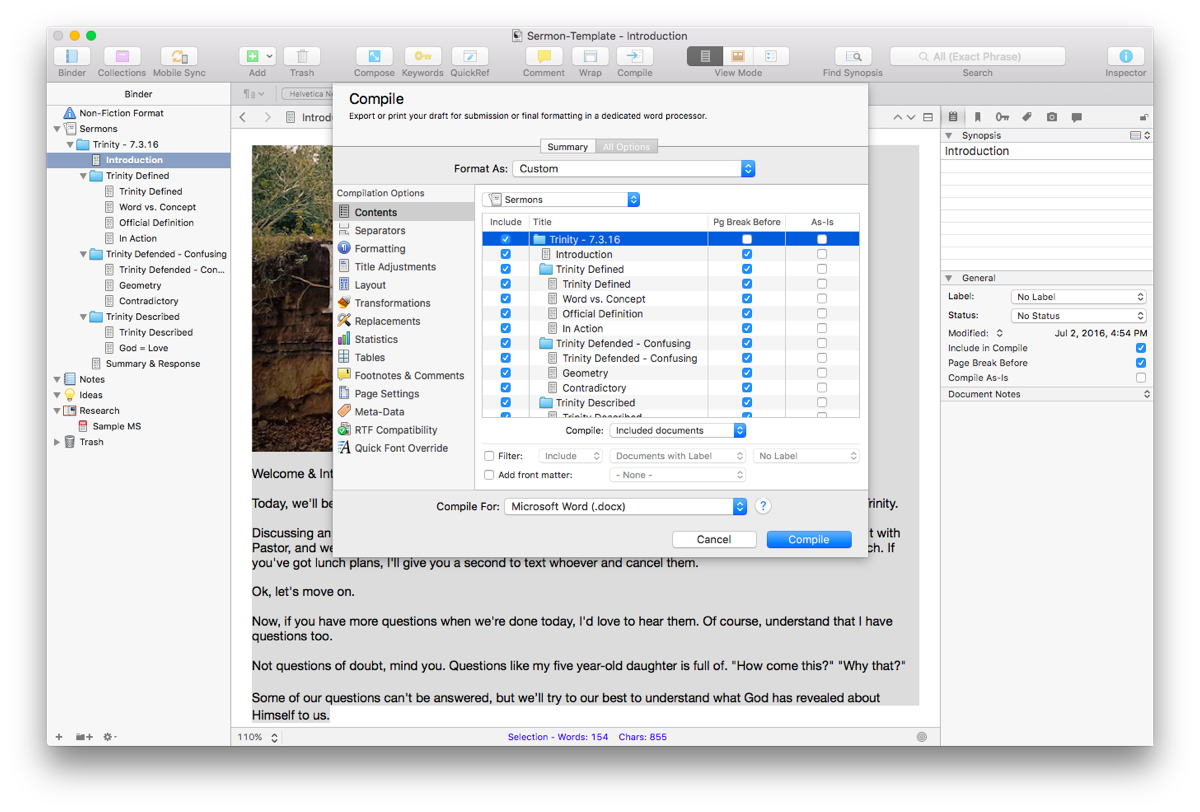
To get your sermon out of Scrivener, you’ll want to press the COMPILE button at the top of the page. Here, you’ll need to experiment with the settings and preferences to get something you like, but I set my file to page break before every point. Once it’s all exported, I can move things around if needed.
Now, for a sermon export, I choose “Compile for Microsoft Word” so that I get an editable file (.docx), which I open in Pages. This, dear friends, is the final step. I proof the message for spacing, spelling, and so on. Then, I print a copy on paper for my media team and for myself (a backup copy) before exporting the official copy as a PDF that I’ll load into iBooks on my iPad.
That’s it! It seems like a lot of work because it is, but so far, I’ve found it to be the best means for organizing my thoughts ahead of a sermon.
If you don’t own Scrivener and are interested in purchasing your own copy, you can find out more information at the app’s website.
Here is a ZIP file of all the files I’ve talked about. Enjoy! (If nothing else, you’re getting a look at my sermon the Trinity in which I perfectly explained every facet of the infinite Godhead in under 35 minutes!)
Phil Schneider
I'm a teacher and discipleship pastor. More importantly, I'm husband to the greatest woman in the world and father to a ridiculously cute daughter. I also occasionally scratch out a few blog posts.


Using Keynote for note cards seems like an odd choice, especially since Scrivener has a note card feature built in – and you’d use a synopsis to create the type of thought you’re describing.
Also, you can include text in a folder in the compile options, under the formatting option, find the folder level and check the “text” box. When I want something to be inserted between the folder title and the main text, however, I typically check the synopsis box and add a synopsis to the folder in question.
I love Scrivener’s outlining features and would love to use it for sermon writing, but until Scrivenings view comes to the iOS version it’s, sadly, a non-starter. Having to jump between documents to progress through the outline is a major pain and breaks my flow of thought. For me, each sermon is in a folder with two documents, the first contains my thoughts/big idea and the other is my sermon manuscript. I outline my individual sermons using Markdown syntax for the different level headers.
Hey, Wezlo. Using Keynote for notecards isn’t that odd, since I then use those same slides for the actual sermon presentation.
And thanks for the tip about the folders. I ended up finding it about two weeks after this went into final edits.
And I don’t have the iOS app yet, but even if I did, I don’t think I would use it for sermon writing. I personally need the focus that comes with sitting down at my laptop.
Hey! Good article. I’ve been using Scrivener for my sermon prep for about 4 years now, and have the iOS version on my iPad and iPhone as well. This enables me to edit and add to my notes if something occurs to me as I’m walking the dog or similar. The sync works well.
I don’t usually use keynote as I tend to go old school when preaching (whiteboard and pen!), but may well give it a bash after reading your article 🙂
I have left feedback to Literature and Latte (Scrivener’s developers) requesting a compile to pages format but apart from this (minor) inconvenience, find Scrivener VERY helpful in organising and writing my messages 🙂
I wonder if that’s possible at all with Pages being a proprietary format under Apple’s control. I hope I’m wrong there. I’m glad I’m not the only iOS scrivener user out there!
You’re not wrong, Chris. Unless Scrivener wants to pay the licensing fee, that won’t be an option.
Julian, in your opinion, how does the Scrivener iOS/Mac sync compare to Evernote’s?