This is just about my favorite topic when it comes to live or studio engineering. In my opinion, getting average sounding drums is easy, but it’s worth putting in the effort as they can absolutely make or break an entire mix. Plus, it’s a really great chance to experiment and get stuck into wondering what might work where, and generally indulge your inner audio-nerd.
So where do you start getting a decent drum sound when it comes to mics?
Well the answer is: Simple.
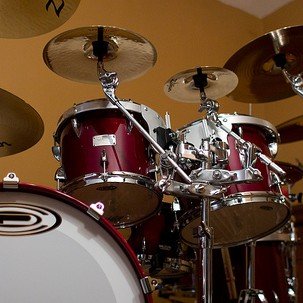
“Overheads” are a hugely useful tool when it comes to mic’ing up drums. They allow you to capture a good deal of the sound of the complete kit, and depending on how you use them you can get maybe 90% of an ‘open and natural’ sounding kit, you can make them more ambient or more focused in on one part of the kit (cymbals for example). However you use them, overheads can really solidify a drum sound by helping closer spot mics to gel together better, and they are an excellent starting place when putting up a rig.
I’ve seen engineers record complete drum kits using just two large diaphragm condensers, which you might loosely call overheads. One mic is positioned above and to the right of the drummer’s head looking directly towards the second tom. The other mic is rigged on the other side of the kit about 3 feet away from the kick and round towards the snare drum, looking just beneath the high-hat. In this position, you can get a really solid drum sound just in mono, and then by panning them hard left and right you get a decent stereo image. As the two mics are the same distance from the kick and snare on either side, when the channels are panned outwards both the kick and snare stay central in the image and the toms and cymbals naturally spread outwards from there. It’s not quite as close and ‘precise’ as the one mic per drum approach but it is a much more open sound.

Of course, this technique requires some careful listening and then tweaking the position of the two mics to get the best stereo image, and of course the best out of the drums. It also means you have to have a lot of faith in your drummer to balance the individual drums against each other, as it’s actually quite common for the drummer to be completely unaccustomed to this approach. Often they will say something along the lines of: “This doesn’t sound right”, so they may need more time to get comfortable or “I can’t hear the high tom”, which is easy to deal with, just tell them to play the high tom louder. A really well tuned and good sounding kit is absolutely necessary to pull this off, you can’t ‘fix it in the mix’ by eq’ing out a nasty ring from the snare drum, it’s all got to sound good right from the start in the drum booth.
If that approach is a little too old-school for your taste, or you are looking for a closer and punchier sounding kit, then going down the close-mic’ing road is probably more appropriate. But don’t just stick one dynamic mic on everything, be creative! You really don’t necessarily have to mic every drum or cymbal independently .
Even when you’re close mic’ing, a pair of condensers are still a very valuable tool as overheads. A lot of engineers will choose large over small diaphragm condensers for this purpose, mostly because of their inherent frequency response. Small diaphragms generally speaking provide a much flatter response, which goes further down into the low-frequency range compared to large diaphragms. This is all because higher frequencies have a smaller wavelength, and you actually don’t have to go all that high for them to be shorter than the diameter of a large diaphragm. For example, 10 kHz has a wavelength of only 1.3 inches compared to the common 1 inch diameter diaphragms found in many condenser mics. As a result, large diaphragms naturally roll off at high frequencies around 10 kHz.
This might all sound overly geeky, but the end result is important! Because of the loss of HF, manufacturers often build in an HF boost to compensate and extend the HF response, a side-effect of which is to give you a bump in the frequency response around 8 or 9 kHz. Dead useful to know if you want to pick out a really sizzley kind of sound from the cymbals.
In short: large diaphragm condensers are natural drum overheads!

When you come to rig your overheads, you can make your mix a lot easier by positioning them so that the kick and snare are central. This is where they are likely to be in the stereo image, so get it right in the drum booth and it will save you having to pan close mics around and losing some definition in the process. Hopefully, you will often find that the snare sound on the overheads is actually pretty decent and natural sounding, so run with them and you may not need so much of the close snare mic. Personally I like to try to capture the majority of the kit on overheads, so I usually start with them quite high and lower them until there is enough snare to balance against the cymbals. Other engineers prefer to use overheads as kind of ambient mics so they have them up very high, and yet more engineers use them mostly for cymbals and toms so have them quite low and close. It’s all a matter of experimentation and personal taste. Whatever your preference, it’s likely that you will want to supplement those overheads with some nice and close individual mics, particularly on the kick drum which contains a lot of low-frequency energy. Large diaphragm condensers probably don’t go down as low as you might like for a really deep kick sound, but don’t be put off as it helps prevent the kick from overwhelming the rest of the kit.
Finally, don’t be afraid to be unconventional with mic rigs. If for instance you have a large kit to record, you might feel you can’t get enough spread from two overheads without getting loads of spill or ambience, so try three mics. Or if you are working with a really simple and small kit, why not try a near-coincident stereo pair? Besides, “variety is the spice of life”… so mix it up, don’t be tempted to just put up the same pair of overheads that you always do and forget about them.
Have you seen or used out of the ordinary overheads?
I once came across a rig at a live gig, using two ribbon mics as overheads with a portable vocal booth screen suspended above each one to deaden the reverb and crowd noise that would have been picked up from the rear of the mic. I haven’t yet tried this myself.
[Images via kamalaboulhosn]
Andrew Riches
I'm a full time audio engineer and am obsessed with how things work. Currently I am indulging my inner-geek at cobaltaudio.com where I am currently the lead blogger and primary engineer.


The best trick I use is an SM57 on the top and a Sennheiser 422 on the bottom of snares and toms. I’m told that it’s the way they got the amazing drum sound on Rich Mullins track of Everywhere I Go I See You. Of course, this only sounds good if the set sounds good, so tweaking the actual set is also my biggest payoff.
Great article!
Thanks, glad you liked it.
What do you generally use as overheads?
There’s plenty more to come on close mic’ing… watch this space!
Most of my stuff goes in two directions. The low budget stuff gets either sm81’s or c1000’s. Higher budget stuff gets KM184 or KSM32. I have had some great success with some older Neumann tube mics, but they aren’t usually available.
I try to use two mixed pairs in a typical x axis array located approximately (I like to move them while listening) 2 feet above the ride and crash.
See, now we’re talking!! Older Neumann tube mics?? Yumm! which ones?
There is this great studio in North Alabama that has so many vintage mics they don’t have enough storage for them. I used the old U48, U49 and U50 there. They also had mid to late 70’s Neve consoles. There were times when I would set the gain stages and just bring up the faders without any eq at all. Amazing!
Well, after talking about vintage Neumann mics, there’s nothing left to say! I would love to play with some of those.
Just heard I’ve got a pair km57’s waiting to be collected after extensive maintenance + repairs!! Can’t wait to get them rigged up over a decent drum kit
sorry, km56’s