I love Evernote, but I’m usually so busy using it that I haven’t had any time learning how to properly use it.
¯_(ツ)_/¯
Fortunately, some of Evernote’s features are so simple that even I have time to pick them up. Basically, I want a feature that I can immediately put to use in solving a problem or saving me time, and one of my biggest problems is keeping track of the writing projects I’m working on. Currently, my Evernote contains three or four of my books, all of my ChurchMag blog posts, my personal blog posts, all of my class scheduling for church, and a whole host of other notes. In all of that “productivity,” it’s easy for my “working items” to get lost. That’s where I’ve not implemented a “Working Items” list in my Evernote, and this is the tip I’d like to share with you today.
(This particularly tip evolved from a separate suggested that came to me via my friend Jason, who learned it from Michael Hyatt, someone whom you might want to permanently associate with Evernote.)
The Working Items List—What & Why
Before we get into the “how,” let’s look at what I’m talking about and why.
The “working items” list is what, I like to think, the Desktop was designed to be: a collection of everything you’re working on. Not a subtle concept, but a vital one. Just yesterday, I found a blog post that I’d started and “lost” in the shuffle of other notes.
That’s why I decided to make the “working list” in Evernote. No more lost notes. No more wasted productivity. So, if you’re like me and would like a simple but effective listing of all of your “working” notes, here’s how I did it.
How to Make a Working Files List
First of all, you’ll need to do this on a desktop, using the native app or web interface. For the purpose of this demonstration, I’m using the native Mac app.
Secondly, tag all of your current notes. You can use whatever tag you want—I chose “working”—so long as you use the same tag on each. (While you’re at it, you might want to add other relevant, note-specific tags. As mentioned above, Michael Hyatt heartily recommends tags, and I think I might begin to utilize them more, myself.)
Thirdly, got to the search box (or is that technically a “search oval”?) and type in the word(s) you used to tag all of your working notes. Once you do that, all of those notes should appear.
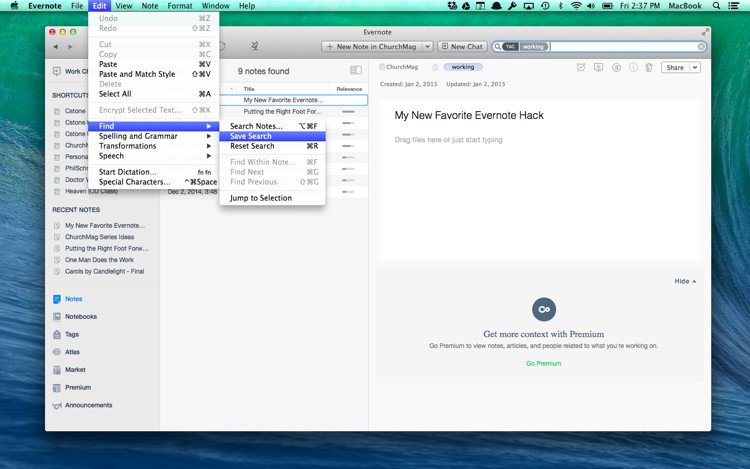
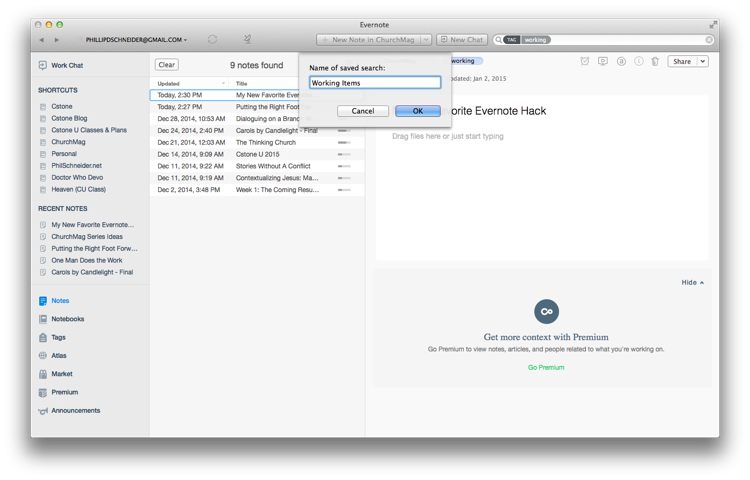
Fourthly, while the tagged posts are still listed, go to Edit/Find/Save Search. Title the saved search whatever you want. I called mine “Working Items.”
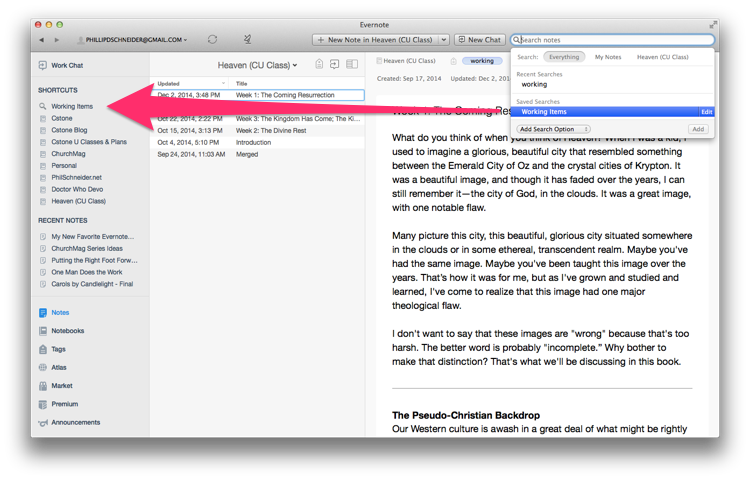
Finally, drag the saved search from the search box/oval to your shortcuts on the far left of your window. Again, title your shortcut whatever you’d like.
Happy Evernoting!
And that’s it! I wish you good luck and happy Evernoting!
What’s your favorite Evernote hack?
(If you’d like more tips on how to maximize your use of Evernote, especially in your church, check out this resource.)

Phil Schneider
I'm a teacher and discipleship pastor. More importantly, I'm husband to the greatest woman in the world and father to a ridiculously cute daughter. I also occasionally scratch out a few blog posts.


that is a great tip! I know what I’m going to do when I get to the office in the morning…
That’s great, Matt. I hope it’s a help to you. Thanks for the comment.
Now THAT is a spiffy hack. Thank you!
Ok, now, I would have thought that the Evernote Grand Master would have known this one. 😛
This is an awesome hack! Thanks, Phil! 😀
Thanks! I hope folks find it helpful.
Genius. I love it. I’ve been using the reminders feature to help keep me informed of my open and working notes, but this is a much easier way to keep things streamlined. Thanks for the insight.
You’re very welcome, Eli! Glad you’ll be able to use it.
Nice hack. That will help me #working.
Thanks, Carl! Glad it well help.